You can take your mountain bike to specialist bike dealers to have your bike or trick scooter tuned , however as you have built it yourself it's worth knowing how to tune it up as part of maintenance yourself as well as save some money.
Even if you have not built your bike yourself this is an essential skill to learn to help prolong the life of your bike. Bike oil can be pretty hard to remove from your nails and hands, oil your bike with latex gloves on.
If all else fails and you do somehow end up with oil on your hands or under your nails, try scrubbing your nails with washing up liquid and sugar then rinse with warm water.
As an extra tip, it is recommended that you add lubrication to your bike often invest in some lubricant, especially for bikes. Use it sparsely on any areas of your bike where metal touches metal. Also, don't oil your chain unless you have cleaned it properly first.
Tune Up A Mountain Bike - Step By Step By Guide
1. Cleaning:
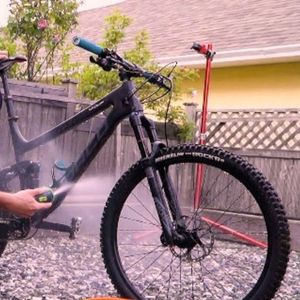
It goes without saying you will need to do this on a regular basis, especially if you are riding along dirt tracks often. Using mild soapy water, a cloth and sponge to gently remove dirt and debris from the wheels and spokes of the bike. Stay away from harsh chemicals these are not needed to make your bike sparkle. Follow above guide to clean your mountain bike effortlessly.
2. Inspect The Drive Train:
Using a medium bristle brush and soapy water clean the derailleur, cassette, chain, and chaining. Once it is dry check it closely for any defects. Defects to look out for are:
Ensure that the bolt chains are tight and in good condition. If you do find anything faulty ensure that you do replace it. Don't leave anything faulty on your bike before you ride it again. Pedal back and forth to also ensure that there are free movement and no friction. Finally Grease the chains and cassette.
3. The Center Brakes:
Press your brakes and listen out for any unusual noises. Check that the brake lever does not reach the handlebar before the bike stops. If you notice this it is a sign that your brake pads and or cable are overstretched. They should be replaced.
To center your brakes simply loosen the bolt that secures the brake caliper on the frame ensure that the brake pads are placed an equal distance on each side of the rim. Re-tighten the bolt, using a wrench to screw it in then, adjust the brake pad position until they are centered on each side of the rim.
4. Checking The Wheels And Truing:
Check that the wheels are pumped up to the right pressure by pressing. If they are not using a tire pump to bring them back to the correct pressure, it is recommended to have 40-psi with the front wheel having 5-psi less than the back wheels.
Turn your bike over and check to see if there are signs of denting or bent wheels, to adjust the bend select around five spokes near to the bend and push back into place. This is a specialist task that you should be comfortable with if you do not take your bike to your local bike shop.

5. Shifting Adjustments:
Check that your chain does not jump around, or skip gears. If you notice this, then this may be because the tension is loose. To test this let one half turn on the barrel adjuster of the rear derailleur and rotate the pedal. If you notice that your mountain bike chain jumps two cogs per shift the cable tension is too loose, replace the cables.

6. Headset Adjustment:
Ensure that your headset has been cleaned properly, to check this lower the folk and remove anything that might be contaminating the area. Add a small amount of grease to your bearings and load them on. If they are completely worn consider replacing them.

7. Maintaining Suspension:
Recheck your manufacturer's guidelines on this, and then ensure that your bike meets the recommended requirements. Measure both your rear and front suspension tags.
8. Tightness In Bolts And Nuts:
Use a wrench to check that each nut and bolt is secured tightly. Check your accessories such as your luggage carrier, lighting, kickstand and generator for defects and that they are secure. Once this is done the test drive your bike.

Spark People recommend six pre-ride checks before you set off on your journey. Firstly, check for any unusual noises or rattles. It may seem a bit harsh, to do this but it is helpful. Pick your pick up a few inches off the ground above a soft surface such as grass. Let your bike fall to the ground, listen for rattles or unusual noises. If you do hear anything this is a sign something is still loose.
9. Top Tip For Rust:
Reader's Digest recommends using salt and lemon juice as a way to combat rusty areas on your bike. It is said that salt can cause rust but can also be used to remove it, if any rust spots appear on your handlebars or bike frame in a small container mix 1/3 of a cup of salt and two tablespoons of the lemon juice mix this into a paste and add to the rusty areas. Gently scrub until good as new.
Relevant Resources:

Hello Guys! I am John Reese, a professional biker and my hobby is biking! I have been biking for last 10 years and I love using bikes while outing as well. Based on my experiences with the different type of bikes (mountain bikes, road bikes and hybrid bikes); I am sharing my opinion about various bikes so that a beginner can get started right away. Happy reading!